You've agonized over the price and decided to pop for the performance advantage top pro cyclists have been insisting on this entire century, namely ball bearings that are lighter, smoother, 2.5 times rounder, 2.5 times harder, and 50 percent stiffer than steel balls and are less affected by heat.
So now what? First, select your bearings from WheelsMfg.com, EnduroForkSeals.com, CeramicSpeed.com, and BocaBearings.com for your hubs, bottom bracket, pedals, or derailleur jockey wheels. Then you can get down to business by doing the following.
Loose-Ball Bearings
If you have cup-and-cone bearings—be they in hubs, bottom brackets or pedals—removing the steel balls and replacing them with ceramic balls will follow exactly the same procedure as overhauling the bearings would. I won't go into detail here because it is straightforward, and because information on how to overhaul these bearings has been widely disseminated (in my books, for example!).
In a nutshell, you loosen and remove the locknut and cone on one side and remove the ball bearings. Clean all of the bearing surfaces, and replace the balls with the same number of ceramic balls of the same size. You can use any grease you wish in the bearing; it will run faster, in the hand at least, with lighter, less sticky greases. I like Slick Honey or Shimano's fluorescent green grease for this; bearing companies and lube companies offer alternatives as well.
Cartridge Bearing Removal
The biggest challenge when upgrading your bearings is removing the old ones, which are pressed in tightly and may also be bonded. It is a whole lot easier to push a cartridge bearing in than it is to get behind it and push or pull it out, and some require special bearing removal tools.
Hubs
First, you will have to remove the axle. The removal process varies by wheel type. If you see hex flats inside of the axle end, you will use a hex key in there. If both ends have them, put two 5mm hex keys inside and unscrew the end caps (Hed is a good example). If only one end has it, the other end must be removed first before you can use the hex key.
Often, at least one end of the axle will pull off; it will have a rubber O-ring engaging grooves at the end of the axle and inside of the end cap, so a good yank will get it off. In practice, this often requires more than just your fingers, however.
Without an axle clamp tool, you can just grab the outside of it with a vise and yank up on the wheel. If both ends are like this, yank both ends off (DT Swiss is a good example). On a DT rear hub, you can often get the drive-side end cap off simply by yanking up on the cogs; the entire freehub body and end cap will come off.
On Mavic rear hubs, pull the left end cap off, stick a 10mm hex key inside to engage the axle, stick a 5mm hex key in the other end, and unscrew.
On a DT or Mavic rear hub, once the axle or drive-side axle end cap is out, you can (carefully) pull the freehub body off of the hub while turning it counterclockwise. Be ready to catch pawls and tiny springs (Mavic) or ratchet rings and large springs (DT).

Figure 1
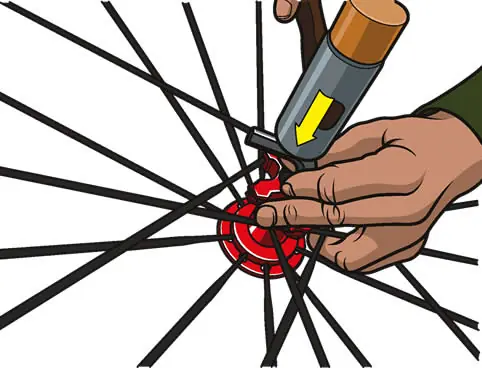
Once the wheel's axle is removed, the cartridge bearings can be popped out with a hex key and a hammer. Simply set the hex key at an angle against the bearing and hammer it out.
If you were able to pull the axle all of the way out, you can now drive the bearings out of the hub with as big a rod or hex key as you can it and cock at an angle to hit the backside of the opposite bearing. Smack it with a hammer until the bearing pops out (Figure 1).


