
When I first got into cycling, I swore I would never wear lycra. I now have a closet full of kits and bibs. Then I swore I would never get one of the fancy watches that track my mileage and pace because that stuff is for the real athletes. Today, I’m equipped with a heart rate monitor, multisport watch and power meter to monitor and analyze every metric.
So I can sit here and say, I’d never need a pair of sunglasses to monitor my metrics and workouts, but quite quickly I’m learning to never say never. The future of technology is right before my eyes—literally—in the form of SOLOS Smart Glasses.
For more information on SOLOS, visit the website.
The Set-Up
With any new device, whether it’s a new Apple TV or cycling computer, the necessary initial set-up customizes your user experience and only has to be done once. The Smart Glasses are no exception. In fact, there is a simple instruction list right on the inside cover of the box to help you get going.
First, download the SOLOS app by searching “Solos Wearables” in your App Store or Google Play Store. You can actually do this at any time to set up your athlete profile, pair devices, set your data screen options and designate other features such as auto-pause, data screen rotation and manual/auto start mode. For example, if you’re using the glasses in a race, you may not want auto-pause turned on, but on a Saturday social ride, you can easily make that switch right in the app.
Spend time with the app as it is ultimately your customizable control center to the type of user experience you want to have with the smart glasses. If you want to see your speed but didn’t set that as a parameter, it will make for a frustrating session.
I felt like I was in my own little video game, albeit I wasn’t achieving any high scores those first few times out.
When you receive the glasses, power them up, turn on bluetooth and begin the pairing process with your phone. This will take a few minutes, but once you’ve connected SOLOS, you can then begin your activity. From there, every time you want to use your glasses, make sure Bluetooth is turned on and your phone is connected to the SOLOS device.
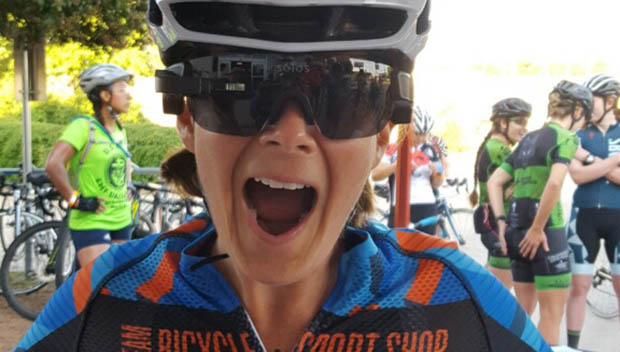
The Optics Module Arm and Display
Before you get moving, make sure you can see the screen well. The SOLOS Smart Glasses actually have three adjustment points on the optics module.: You can adjust the tilt of the screen, as well as the horizontal and vertical plane. I positioned mine so the data would display in the top right of my peripheral vision without causing any distraction with the view ahead. In fact, vision was one of my apprehensions and why I did some initial testing from the safety of my indoor trainer. I wanted to make sure I set the optic arm properly so as not to impede my vision. But good news—it doesn’t! In fact, on my first ride outside, there was no distraction at all. I had to actually remind myself to glance upwards to see the data. It was quite unobtrusive and the data screen was transparent enough to see through it while still being bright and full-color. I felt like I was in my own little video game, albeit I wasn’t achieving any high scores those first few times out.
I received many questions about the weight of the glasses on my group rides. Sure, they carry a little more bulk than typical sunglasses, but at just 65 grams, they can still be considered light. I wore them on the bike with a normal road helmet and on runs with a trucker hat and experienced no interference with the headwear. My biggest consideration? The slightly larger lenses on my rather petite face. Still, even though the lenses were large, they weren’t uncomfortable and a small adjustment to the nosepiece made them fit snugly. Plus, they also have an option for prescription inserts!
On both my test rides and runs, there was a small amount of bounce, but I didn’t experience any slippage of the glasses or drop of the optic arm. Both firmly held their place throughout training sessions.